
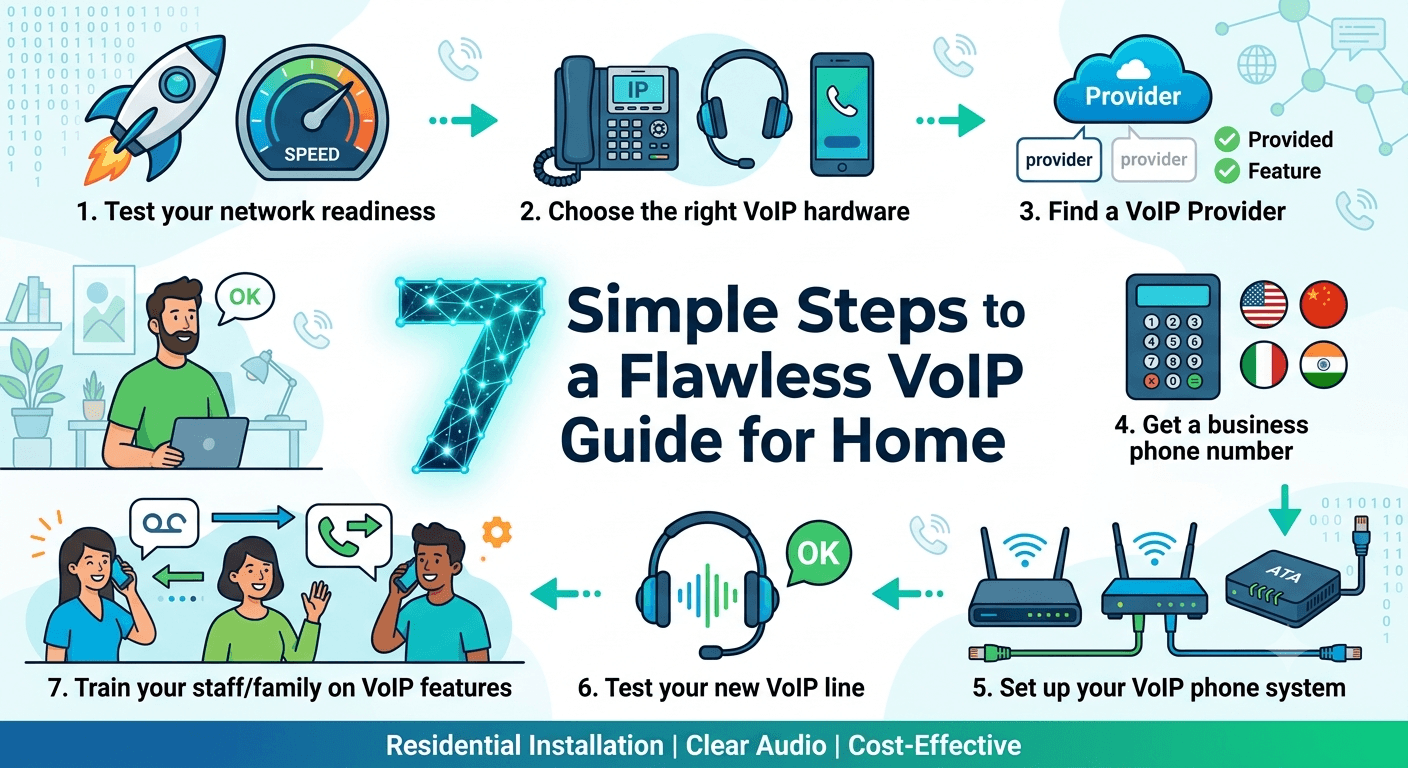
Completing a successful residential installation requires understanding specific VoIP setup guide for home requirements to ensure clear audio and uninterrupted service. To set up a Voice over Internet Protocol system at home, you need a high-speed internet connection with at least 100Kbps of bandwidth per call, a compatible router, and a VoIP-enabled device like an IP phone or a computer with softphone software. The process involves selecting a reliable service provider, configuring your network settings to prioritize voice traffic, and connecting your hardware to your modem. Proper configuration prevents common issues such as echo, latency, and dropped calls during peak usage.
VoIP, or Voice over Internet Protocol, has revolutionized how we communicate by allowing us to make voice calls using the internet rather than traditional copper wires. Transitioning to this technology for your home office or personal use is not only cost-effective but also provides advanced features that were once only available to large corporations. When you begin the journey of setting up voip, you are essentially moving your phone service into the digital age. This transition requires a shift in how you view your home network, as it becomes the backbone of your entire communication system.
The first step in any residential installation is to acknowledge that your internet quality is the most significant factor in call clarity. Unlike traditional analog lines that are separate from your data, setting up voip phone at home means your voice is competing with your Netflix streaming, gaming, and web browsing. Therefore, understanding the basic voip setup requirements is essential to ensure that your voice packets always take priority. By following a structured approach, you can achieve a professional-grade communication setup that is reliable, secure, and easy to manage from the comfort of your own living room.
VoIP Key Terms
Before diving into the actual voip installation, it is helpful to familiarize yourself with some key industry terms. Understanding these concepts will make the voip configuration process much smoother. Session Initiation Protocol (SIP) is the most common standard used to signal and control multimedia communication sessions. You might also encounter the term “Latency,” which refers to the delay between a speaker saying something and the listener hearing it. High latency can make conversations feel disjointed and unnatural.
Another important term is “Jitter,” which is the variation in the time it takes for data packets to arrive. If packets arrive out of order, the audio can sound robotic or garbled. To combat this, many routers use a “Jitter Buffer” to collect and reorder packets before they are played back. Additionally, “Bandwidth” is the amount of data your internet connection can handle at once. When you are looking into how to setup voip, ensuring you have enough bandwidth is a primary concern. Finally, “Packet Loss” occurs when data packets are dropped during transmission, leading to gaps in conversation.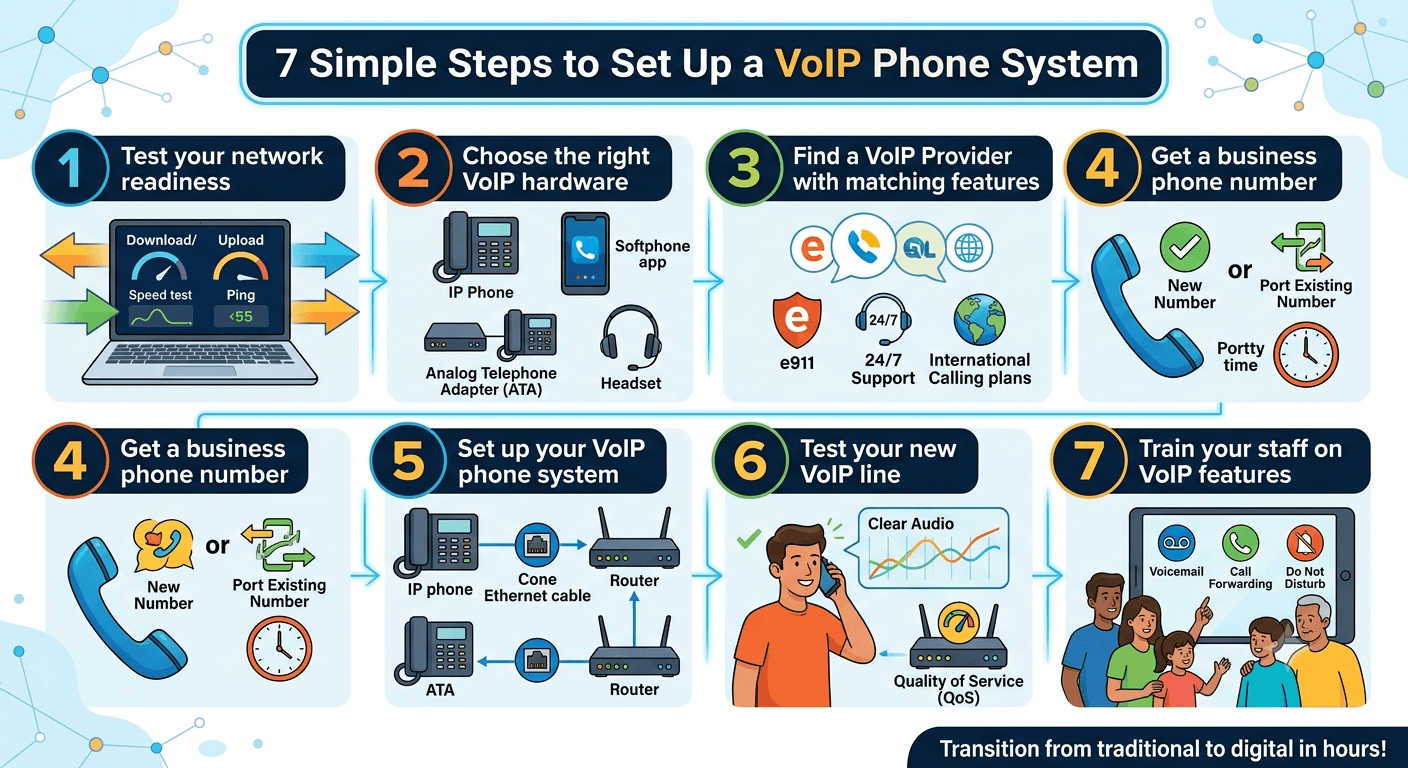
What Is VoIP?
At its core, VoIP is a technology that allows you to make voice calls over a broadband internet connection instead of a traditional (analog) phone line. Some VoIP services may only allow you to call other people using the same service, but others allow you to call anyone who has a telephone number—including local, long-distance, mobile, and international numbers. When you use a voip phone connection, your voice is converted into digital packets, transmitted over the internet, and then converted back into audio on the other end.
This technology is highly versatile. You can use it via a computer with a headset, a specialized IP phone, or even your existing smartphone through a dedicated app. The beauty of this system is that it is not tied to a physical location. As long as you have an internet connection that meets the voip setup requirements, you can take your home “landline” anywhere in the world. This flexibility is a major reason why many people are moving away from traditional telephone companies in favor of digital solutions.
How Does VoIP Work?
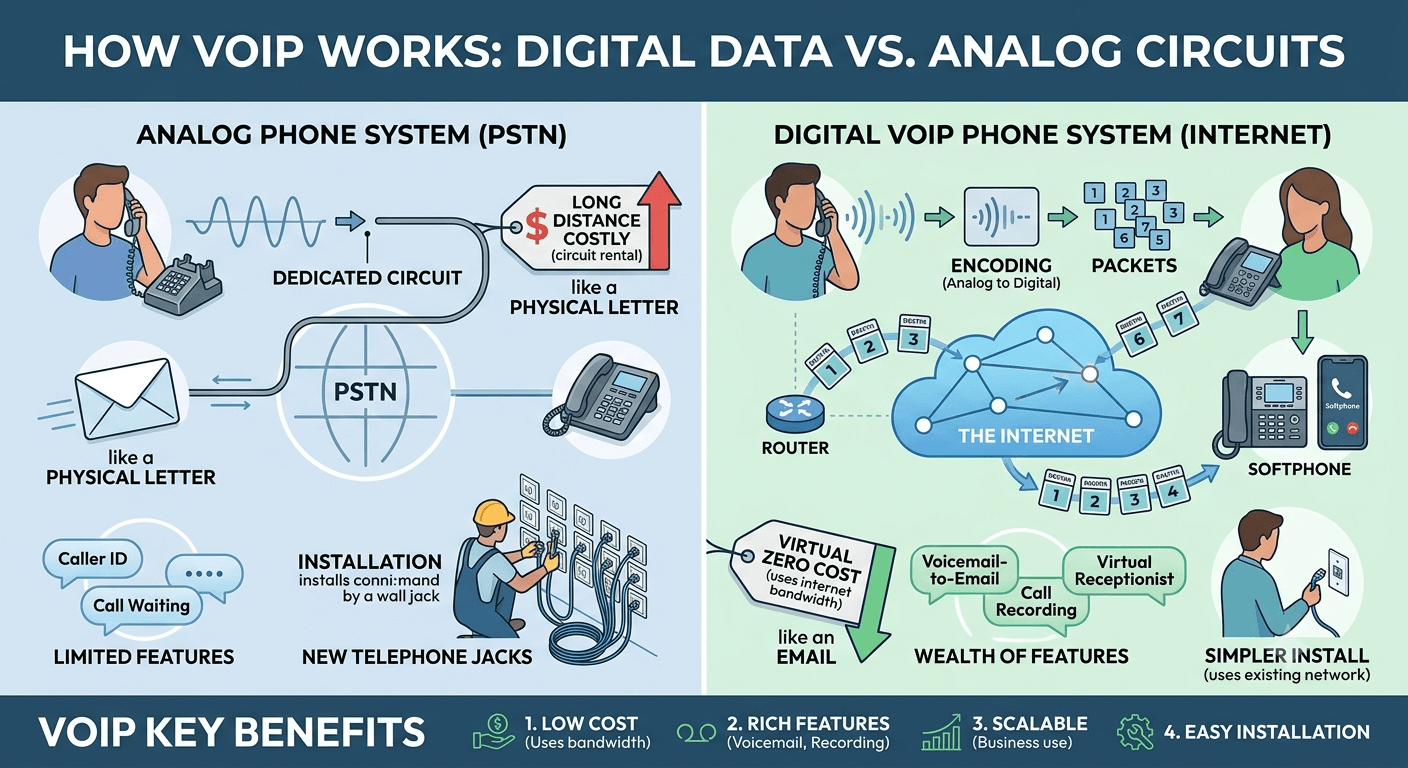
The mechanics of how voip works involve several layers of digital processing. When you speak into a microphone, the analog sound waves are sampled and converted into digital data through a process called “encoding.” This data is then broken down into small chunks called “packets.” Each packet is labeled with its destination address and sent across the internet. Because the internet is a packet-switched network, these packets may take different routes to reach the destination, but they are reassembled in the correct order once they arrive.
This process happens almost instantaneously. To ensure the packets arrive in a timely fashion, the system uses various protocols to manage the flow of data. If you are setting up voip for small business or home use, your router plays a crucial role in directing these packets efficiently.
According to a research study by Transparency Market Research, the global adoption of VoIP is expected to reach a market valuation of over $190 billion by 2024, largely due to the efficiency and scalability of this packet-switching technology compared to legacy systems.
VoIP phone system vs. analog phones
The difference between a modern voice over ip phone system and a traditional analog phone is like the difference between an email and a physical letter. Analog phones use the Public Switched Telephone Network (PSTN), which requires a dedicated circuit to be held open for the duration of the call. This is why long-distance calls used to be so expensive; you were literally “renting” a physical wire across the country. A digital voice system, however, uses your existing internet bandwidth, making the cost of the call virtually zero regardless of the distance.
In terms of features, analog phones are very limited. You might get caller ID and call waiting, but that is usually the extent of it. When you look at how to use voip phone systems, you find a wealth of features like voicemail-to-email, call recording, and virtual receptionists. Furthermore, the voip phone installation process is much simpler because it doesn’t require new telephone jacks in every room. You simply connect your phone to your existing internet network, and you are ready to go.
What Do You Need for a VoIP Setup?
While the goal is a simple home configuration, you still need a few core components to meet the voip setup requirements. The most important is a reliable internet connection. If your internet is prone to dropping or is very slow, your phone service will reflect those issues. Beyond the connection, you will need a service provider that offers residential or small business plans. These providers act as the bridge between your internet connection and the global telephone network.
For the hardware, you have several choices. You can use a dedicated IP phone, which looks like a traditional desk phone but has an Ethernet port. Alternatively, you can use a “softphone,” which is just an application on your computer or smartphone. If you want to keep using your existing analog phones, you will need an Analog Telephone Adapter (ATA). This device plugs into your router and allows you to plug in a standard phone cord. Regardless of the hardware, ensuring your voip setup requirements are met at the network level is the key to success.
7 Simple Steps to Set Up a VoIP Phone System
Setting up your home phone system doesn’t have to be a technical nightmare. By following these seven simple steps, you can transition from a traditional line to a digital one in just a few hours. The focus here is on the actual installation and ensuring that your voip phone configuration is optimized for the best possible audio quality. Whether you are setting up voip for small business needs or just for personal use, these steps provide a solid framework for a reliable installation.
1. Test your network readiness
Before you spend money on hardware, you must ensure your home network can handle the additional traffic. This is the most crucial of all voip setup requirements. Use an online speed test tool to check your download and upload speeds. For a single VoIP line, you want to see at least 100Kbps of consistent upload speed available specifically for the call. If you have multiple people in the house using the internet simultaneously, you should aim for much higher speeds to avoid congestion.
Latency is another factor to test. Your “ping” time should ideally be under 100ms. Anything higher can lead to annoying delays where you and the caller end up talking over each other. You should also check for “jitter” and “packet loss.” A high-quality internet connection will have zero packet loss and jitter below 30ms. If your network doesn’t meet these standards, you may need to upgrade your internet plan or replace an aging router before proceeding with the voip installation.
2. Choose the right VoIP hardware
The type of hardware you choose will depend on how you plan to use your phone. If you work from home and spend a lot of time on calls, a dedicated IP phone is usually the best choice. These devices are built for voice and often include superior microphones and speakers. For those looking for the most cost-effective ip phone setup, using a softphone app on a smartphone is a great way to start without buying any new equipment.
If you prefer the feel of a traditional handset, look for voip hardware that includes an ATA. This allows you to use your existing home phones while still benefiting from digital service. When selecting hardware, make sure it is “SIP-compatible,” as this is the industry standard that almost all providers use. Investing in a good pair of headsets for voip phones can also significantly improve your experience, especially if you need to keep your hands free for typing during calls.
3. Find a VoIP Provider with matching features
Not all VoIP providers are created equal. Some focus on residential users with simple, low-cost plans, while others provide complex voip call center solutions for large businesses. For a home setup, you want a provider that offers a user-friendly dashboard and mobile app support. Look for features like “e911,” which ensures that emergency services can find your home address even though you are using an internet-based phone.
Check the provider’s reputation for uptime and customer support. Since you are setting up voip yourself, you may need help with the initial voip settings if something goes wrong. A provider that offers 24/7 support and has a comprehensive online knowledge base will be invaluable. Also, consider the cost of international calls if you frequently talk to friends or family abroad. Many providers offer unlimited calling plans for a flat monthly fee, which can save you a significant amount of money compared to traditional carriers.
4. Get a business phone number
Even for home use, you may want a dedicated “business” number if you run a small shop or freelance. Most VoIP providers allow you to choose a new local number or even a toll-free number. If you already have a phone number that you’ve used for years, you can usually “port” it to your new VoIP service. This means you don’t have to tell everyone a new number, making the phone system setup much less disruptive.
The porting process can take anywhere from a few days to two weeks, so plan accordingly. While the number is being moved, your provider will usually give you a temporary number so you can start using your new voip phone connection immediately. Having a dedicated number for your home office helps maintain a professional image and allows you to separate your work life from your personal life by setting specific “do not disturb” hours in your voip configuration.
5. Set up your VoIP phone system
Now it’s time for the physical voip phone installation. If you are using a dedicated IP phone, connect it to your router using an Ethernet cable. If your router and phone support Power over Ethernet (PoE), you won’t even need a separate power adapter for the phone. For softphones, simply download the application from your provider’s website or your mobile app store. Once the software is installed, you will need to log in using your new voip account credentials.
If you are using an ATA, connect it to your router and then plug your traditional phone into the “Phone 1” port on the adapter. Most adapters will have a sequence of lights that indicate when they have successfully connected to the internet and the VoIP server. During this stage, you may need to access your router’s settings to enable a feature called “SIP ALG” or, in some cases, disable it if it causes issues. This is a common part of setting up a voip phone at home and is usually documented in your provider’s setup guide.
6. Test your new VoIP line
Once everything is plugged in and logged in, you must test the line. Don’t wait for an important call to find out that your microphone isn’t working or that there is an echo. Make a few test calls to friends or use the “echo test” number provided by many services. Listen for any distortion or delays. This is the time to fine-tune your voip settings. If the audio is choppy, try moving your phone or ATA to a different port on the router or try a different Ethernet cable.
Test the system while your network is under load. Start a large download on your computer or stream a 4K video on your TV while you are on a call. If the audio quality drops significantly, you will need to configure your router’s Quality of Service (QoS) settings. QoS tells your router to put voice packets at the front of the line, ensuring that your call remains clear even if the rest of your network is busy. This step is vital for meeting professional voip setup requirements in a busy household.
7. Train your staff on VoIP features
If you are a solo user at home, “training” might just mean spending twenty minutes exploring your provider’s mobile app and web portal. Learn how to set up call forwarding, how to check your digital voicemail, and how to use the “do not disturb” feature. If you have family members or a small team at home, make sure everyone knows how to make a voip call and how to transfer calls if necessary.
Understanding how to use voip phone features like “three-way calling” or “call park” can make your daily communication much more efficient. Most modern systems also offer integration with other tools like Google Contacts or Outlook, which can save you time when dialing. The more familiar you are with your voip phone configuration, the more value you will get out of your new system. Taking the time to master these features ensures that your voip phone installation is a total success.
Can You Set Up Your Own VoIP at Home?
Many people wonder if they can handle the voip installation without professional help. The answer is a resounding yes. Modern VoIP services are designed for the average consumer, and the hardware is generally “plug and play.” While setting up a corporate voip call center might require an IT team, a residential setup is well within the reach of anyone who can set up a basic home Wi-Fi router. The key is to follow the instructions provided by your service provider and not skip the network testing phase.
According to a report by BlueFace, businesses can save up to 90% on international calls and 40% on local calls by switching to VoIP. These same savings apply to home users. By taking a “Do-It-Yourself” approach, you also save on the installation fees that traditional phone companies often charge. Furthermore, when you know how to setup voip yourself, you are better equipped to troubleshoot minor issues in the future without waiting for a technician to visit your home.
1. Invest in VoIP-optimized equipment
While you can use basic gear, investing in voip hardware that is optimized for voice can make a big difference. Look for routers that explicitly mention “VoIP Support” or “Advanced QoS.” These routers are better at identifying voice traffic and ensuring it doesn’t get delayed by other data. High-quality voip phone hardware also includes better noise-canceling technology, which is helpful if you have a noisy home environment with kids or pets.
Don’t neglect the cables. Using old, damaged, or very long Ethernet cables can introduce electrical interference. Using Category 6 (Cat6) cables for your voip phone connection is a cheap and effective way to ensure the best possible data transmission. If you are using a wireless setup, ensure you are on the 5GHz band of your Wi-Fi, as it is generally less crowded than the 2.4GHz band, leading to fewer interruptions for your voip telephony.
2. Use softphones instead of complicated VoIP hardware
For many home users, the simplest way to get started is by ignoring physical phones altogether and using softphones. This eliminates the need for extra cables and dedicated desk space. A softphone is an app that turns your laptop or smartphone into a fully functional VoIP terminal. When you are setting up voip phone apps, you just need to enter your username and password, and you are ready to make calls.
Softphones are particularly useful for remote workers. You can have your home office “landline” ring on your laptop while you are working at a coffee shop or traveling. This mobility is one of the primary benefits of learning how to use voip effectively. Most softphone apps also include built-in encryption, adding an extra layer of security to your conversations that traditional analog lines lack.
3. Secure your VoIP system
Security is a critical part of voip setup requirements. Because your phone system is connected to the internet, it can be targeted by hackers if left unprotected. Ensure that your voip account uses a strong, unique password. If your provider offers two-factor authentication (2FA), enable it immediately. This prevents unauthorized users from logging into your account and making expensive international calls on your dime.
You should also secure your home router. Change the default admin password and ensure your Wi-Fi is encrypted with WPA3 or at least WPA2. Some advanced users might even look into how to setup voip server at home using software like Asterisk or FreePBX. While this gives you total control, it also increases your security responsibility. For most home users, using a reputable cloud-based provider is the safer and easier path for a secure voip installation.
4. Monitor, analyze, and optimize
Once your system is up and running, don’t just forget about it. Periodically check your call logs and quality reports in your provider’s portal. If you notice a trend of poor call quality at certain times of the day, it might indicate that your internet service is struggling during peak neighborhood usage. Knowing how to set up voip also means knowing how to maintain it.
If you experience persistent issues, use the troubleshooting tools built into your voip configuration. Many IP phones have a “status” menu that shows real-time statistics for the current call, including packet loss and jitter. Monitoring these metrics can help you determine if a problem is with your local network or with the service provider’s network. Continuous optimization ensures that your home phone system remains as clear and reliable as a traditional landline.
5. Plan for redundancy and failover
One downside of VoIP is that it requires electricity and an internet connection. If your power goes out or your internet goes down, your phone won’t work. To meet professional voip setup requirements, you should have a failover plan. Most VoIP providers allow you to set up “Call Forwarding on Unreachable.” This means that if your IP phone loses its connection, the system will automatically forward calls to your mobile phone.
Investing in a small Uninterruptible Power Supply (UPS) for your modem and router is another great tip for home users. This will keep your internet and phone system running for several hours during a power outage. This redundancy is particularly important if you live in an area prone to storms or if you rely on your home phone for safety and emergency communication.
VoIP Troubleshooting Tips
Even with a perfect setup, you might occasionally run into issues. Most common problems can be solved with a few simple adjustments to your voip settings. If you experience one-way audio (where you can hear them but they can’t hear you), it is almost always a firewall issue. Your router might be blocking the incoming voice packets. Disabling “SIP ALG” in your router’s settings is the most common fix for this specific problem.
If your calls are dropping after exactly 30 seconds or one minute, this is usually a signaling issue related to the “NAT Keep-alive” settings in your voip configuration. Adjusting the frequency at which your phone “checks in” with the server can solve this. For those using a voip phone connection via Wi-Fi, moving closer to the router or switching to a wired connection can solve 90% of audio quality issues instantly.
1. Use wired Ethernet connections
Whenever possible, avoid using Wi-Fi for your primary voip hardware. While Wi-Fi has improved, it is still susceptible to interference from microwave ovens, baby monitors, and other wireless networks. A wired Ethernet connection provides a dedicated, interference-free path for your voice data. This is one of the most effective ways to meet the highest voip setup requirements for audio clarity. If you can’t run a long cable, consider using “Powerline Adapters” that send internet data through your home’s electrical wiring.
2. Configure QoS to prioritize voice traffic
As mentioned earlier, Quality of Service (QoS) is your best friend when setting up voip at home. Most modern routers have a QoS menu where you can list your IP phone’s MAC address or the specific “ports” used by your VoIP service. By giving these items “High Priority,” you ensure that a large Windows update or a heavy game download doesn’t ruin your phone call. This is a “set it and forget it” configuration that significantly improves the reliability of your system.
Read More: What is a2p Calling? Benefits and Usage of a2p Calling
Final Thought
Setting up a VoIP system at home is a rewarding project that offers long-term savings and incredible flexibility. By focusing on the essential voip setup requirements—such as a stable network, the right hardware, and a reliable provider—you can enjoy a communication experience that far exceeds what old analog lines could offer. Whether you are building a small home office or just want a better way to stay in touch with family, following this voip setup guide will ensure you have a professional-grade system that is both easy to use and maintain. With the right configuration, your home phone will be ready for the digital future.
FAQs
What is required for VoIP setup?
For a basic home VoIP setup, you need a high-speed internet connection (minimum 100Kbps upload/download per line), a router that supports Quality of Service (QoS), and a VoIP-enabled device such as an IP phone, an analog telephone adapter (ATA), or a softphone application. You must also have an active subscription with a VoIP service provider to manage your calls and provide your phone number.
Can I set up a VoIP system without a VoIP provider?
Technically, you can set up a private VoIP network to call between rooms in your house without a provider, but to make calls to the outside world (mobile phones or landlines), you must have a service provider. The provider acts as a gateway to the Public Switched Telephone Network (PSTN). Without a provider, you won’t have a phone number that others can call from their regular phones.
What’s the difference between SIP and VoIP in setup?
VoIP is the broad category of technology used to send voice over the internet, while SIP (Session Initiation Protocol) is a specific language or “protocol” used to set up and tear down those calls. In a typical setup, you will use a VoIP service that relies on the SIP standard. When configuring your hardware, you will often enter “SIP settings” provided by your VoIP company to get your device online.
How secure is VoIP for business communications?
VoIP is very secure if properly configured. Most modern providers use encryption (like SRTP and TLS) to protect your voice data from being intercepted. To maintain security at home, you should use strong passwords for your VoIP account, keep your router’s firmware updated, and use a dedicated VLAN for voice traffic if your router supports it. These steps prevent unauthorized access and eavesdropping.
Do I need a PBX system to run VoIP?
No, you do not need a physical PBX (Private Branch Exchange) system at home. In the past, businesses used large PBX boxes to manage multiple lines, but today, most VoIP providers offer a “Hosted PBX” or “Cloud PBX.” This means the provider handles all the complex call routing and features on their servers, and you only need to manage your internet connection and end-user devices.
How long does it take to fully set up a VoIP phone system?
A basic home setup can be completed in less than 30 minutes if you are using a softphone app. If you are setting up physical IP phones or an ATA, it might take about an hour to connect the hardware and configure the network settings. If you are porting an existing phone number from an old carrier, that specific part of the process can take between 5 to 14 business days.
What should I do if I experience packet loss during VoIP calls?
If you experience packet loss, first try switching from Wi-Fi to a wired Ethernet connection. If you are already wired, check your router’s QoS settings to ensure voice traffic is prioritized. You should also restart your modem and router to clear any temporary bottlenecks. If the problem persists, contact your Internet Service Provider (ISP), as the issue may be with the quality of the line coming into your home.
Which is better, VoIP or VoLTE?
VoIP is better for general home and office use because it works over any internet connection and offers a wide array of business features. VoLTE (Voice over LTE) is a specialized type of VoIP used specifically by mobile phone carriers over their cellular networks. While VoLTE is excellent for high-quality mobile calls on your smartphone, it cannot replace a full-featured home or business VoIP phone system.
How to setup your own VoIP?
To set up your own VoIP, begin by testing your internet speed and choosing a provider that fits your needs. Purchase an IP phone or download a softphone app. Connect your hardware to your router via an Ethernet cable and log into your provider’s web portal to configure your settings and assign your phone number. Finally, perform an echo test to ensure your audio is clear and your network is stable.